
Overview · RCC ClusterDocs
ClusterDocs NG TL;DR
This page is the shortest useful introduction to RCC. Read it before connecting for the first time, or use it to find the right detailed guide.
Start with RCC Expedition: If you are new to RCC or preparing a new computer, begin with the self-contained RCC Expedition course for Windows 11 and macOS. It covers workstation security, SSH, Linux, Slurm, storage, data transfer, and reproducible workflows; return to this TL;DR for the current RCC rules and links.
RCC in one minute
RCC is organised around people and projects:
- your individual account is your personal badge and must not be shared;
- every user has exactly one primary group, meaning their home department or organisational affiliation; and
- a user can join one or more projects, which are the shared workrooms where named people from different primary groups can work with the same approved data.
The primary group says where you belong. The project says which research data, services, and collaborators you may work with. Do not change somebody's primary group merely to share project data; add their individual account to the project.
person -> individual RCC account -> exactly one primary group (affiliation)
                              \-> one or more projects (collaboration)

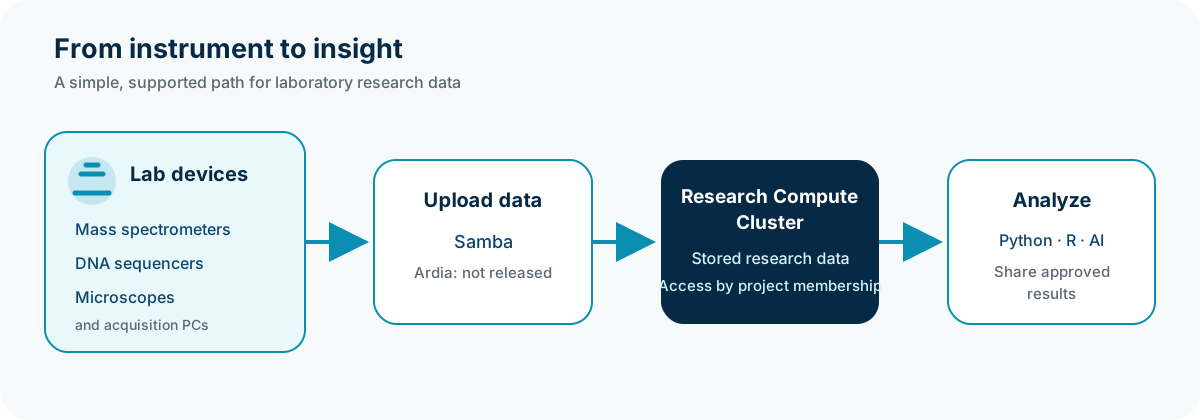
Lab-network instrument
    -> approved Samba share for its project [ready]
       or future Ardia integration [not yet released]
    -> RCC project storage -> Slurm analysis -> project results
    -> optional protected vhost for that project [not yet released]
    -> reviewed archive set -> Coscine later [not yet released]
Samba is the technology behind a Windows-style network folder. For a registered Lab-network instrument or acquisition computer, RCC can approve a project-scoped Samba share so completed data arrives in the project rather than in one person's home directory. Ardia integration is not yet released. Its future mass-spectrometry data flow must use a vendor-supported integration or export path instead of treating Ardia as an ordinary folder.
Project vhosts are not yet released. When the service is released, a project that needs an easier browser interface will be able to request its own protected vhost (virtual host). The vhost will belong to that project and use individual identities plus project membership; it will not be a shared account or a way to expose the whole project directory.
Computation runs through Slurm. Interactive tools such as Jupyter and Shiny also run inside bounded allocations and are reached through protected local connections. A selected final dataset may later move to Coscine after project review and verification. RCC-to-Coscine transfer is not yet released; it remains planned and not yet a live self-service transfer.
Managed Nextflow-to-Slurm support is ready now. The managed service runs
the Nextflow controller on an RCC shellhost or allocation-backed interactive
node and sends
each analysis task to a worker through Slurm. Resume-critical work state will
stay in shared project storage; node-local storage will be used only for
explicit temporary task work. Use the pinned rcc-nextflow launcher instead
of installing an unmanaged Nextflow controller on a login host.
For most users, VS Code with Remote - SSH is the suggested everyday route for coding and preparing data analysis. It combines the editor, remote file view, Git tools, and terminal in one window. VS Code is the interface; Slurm is still where computation runs, and the RCC transfer service is still the route for large data movement.
workstation
    -> approved RCC SSH or files entry point
    -> project storage for durable input, code, metadata, and results
    -> Slurm allocation
    -> job-local storage for active high-I/O work
    -> validated results back to the project
Instrument data follows the same project boundary and can eventually become a reviewed Coscine archive set:
instrument -> RCC project -> job-local analysis -> RCC project results
           -> verified Coscine archive -> recorded RCC disposition
Ten rules that prevent most problems
- Use only your own RCC account. Keep your one primary group as your affiliation and use approved project membership for collaboration.
- Never send a private SSH key, password, token, passkey export, or re-identification key to another person.
- Verify the approved RCC endpoint and host identity; do not bypass an SSH warning merely to make a connection work.
- Put authoritative research data and durable results in the approved project, not a user's home directory.
- Submit computation through Slurm; do not run analysis on login or submission hosts.
- Stage high-I/O temporary work to job-local storage and copy validated results back before the job ends.
- Request realistic CPU, memory, GPU, and time limits. Start with one small bounded test.
- Bind Jupyter, Shiny, and development services to loopback and reach them only through the documented tunnel or governed service path.
- Keep direct identifiers and re-identification keys outside RCC. Confirm that project governance permits every biomedical dataset before transfer.
- Verify every important transfer or archive before deleting a source.
First connection
Start with Class 1: safe access and the access, SSH, and VS Code reference.
The basic sequence is:
- request an individual account and project membership;
- create a dedicated SSH key, preferably hardware-backed where supported;
- register only the public key;
- obtain the current approved RCC configuration through a trusted channel;
- inspect the effective configuration;
- make one bounded connection test; and
- use the approved alias
rcc-loginin current instructions.
The access reference includes a visual VS Code walkthrough plus recommended search, file-watcher, extension, and Workspace Trust settings. Do not copy a server name from a screenshot.
Where files belong
| Content | Correct place |
|---|---|
| Personal configuration and small source files | Home storage |
| Material shared only within your primary group | Approved primary-group storage |
| Authoritative project input | Approved project storage |
| Validated results, code, metadata, and provenance | Approved project storage |
| Active temporary and random I/O | Job-local storage inside the allocation |
| Large browser upload or ordinary download | Approved RCC files service when suitable |
| Retained final archive set | Approved repository or planned Coscine flow |
Home is not a project-data area. A project connects data to its accountable owner, approved purpose, membership, retention, legal context, and continuity when a team member leaves. Home capacity and filesystem behavior are also not intended for large recurring instrument ingestion.
For collaboration across primary groups, request a project whose Unix group contains every approved member. A setgid project directory keeps new files associated with that project group; it does not authorize disclosure or make files group-writable by itself. Use the users, groups, and projects guide for the identity model and the data-sharing guide for colleagues in your project, other RCC groups, and external recipients.
Read Class 14: efficient local I/O, Class 15: storage architecture, and the storage and transfer reference.
How to run work
Use Slurm for batch jobs, interactive shells, notebooks, GPU work, and long analysis. The normal choices are:
srunor a documented interactive allocation for short attended work;sbatchfor reproducible or unattended work;cpu_shortfor jobs up to two hours; and- a regular compute partition for longer bounded, restartable jobs.
Discover current partitions and resources rather than copying old hardware
names. Use squeue to inspect jobs, scontrol show job for reasons and
allocation details, and scancel to stop work you no longer need.
Start with Class 5: Slurm, then keep the Slurm command reference nearby. The shared-compute reference explains owner, shared, borrowed, and requeue behavior.
Reproducible software and workflows
- Put code, configuration, parameters, and small environment definitions in version control.
- Use Snakemake or another workflow system for repeated dependent steps.
- Activate Conda environments inside the job rather than relying on a login shell state.
- Use rootless Apptainer for immutable runtimes when it is the better fit. The container runs with your RCC permissions—not host-root privileges—so it cannot bypass project access or Slurm; it can still change files your user can write, so bind only what the job needs.
- Keep large caches, environments with many small files, and temporary container writes off inappropriate shared paths.
See Class 2: workflows, Class 4: Apptainer, and the software-workflow reference.
Python, R, notebooks, AI, and Shiny
Use Class 9 for Python and Jupyter, Class 10 for R, and Class 11 for Shiny development.
Notebook and application processes are real workloads:
- start them through Slurm;
- bind only to
127.0.0.1during development; - use the generated SSH tunnel;
- keep tokens out of screenshots, chat, notebooks, and Git;
- move long or expensive steps into batch workflows; and
- stop the allocation when finished.
For machine learning and AI, begin with a scientific question and a simple baseline. Record data splits, preprocessing, versions, parameters, metrics, uncertainty, subgroup behavior, and leakage checks. Use a GPU only when the framework and measured workload benefit.
Protected project websites and services
A notebook is not a production service. Use Class 12 to separate request handling from expensive Slurm computation, then complete Class 8 before requesting a governed protected project website. When a project needs a browser interface, request a vhost for that project after the vhost service is released. The current Class 8 material is for planning and training, not an operational request. Each future vhost will have a named project owner, be authorised by project membership, and expose only the approved application or curated data—not every file in project storage. A project will not need a vhost unless it has a clear web use case.
Do not expose an ad-hoc listener, notebook, Shiny app, or development server to the network. Authentication, authorization, proxy behavior, logs, secrets, updates, ownership, and shutdown behavior need review.
Biomedical-data boundary
Complete Class 13: biomedical data privacy before transferring or analysing biomedical data.
Do not place direct identifiers or re-identification keys in RCC. Genomic, imaging, and other biomedical research data may be used only when the approved project governance covers RCC and the required safeguards. Filenames, manifests, notebooks, logs, plots, and support requests can all leak sensitive information; inspect them before sharing.
When uncertain, stop before transfer and ask the responsible project and data governance contacts. The biomedical-data admission guide contains the short decision checklist.
Instruments and the Lab network
Suitable registered instruments and acquisition workstations can use the protected Lab network. It removes general direct Internet connectivity while retaining direct access to explicitly approved server endpoints or services. Limited outbound web access through an explicit HTTP proxy can support approved needs such as updates without allowing unsolicited inbound Internet access.
For an ordinary file-producing instrument, the approved endpoint is commonly a project-scoped Samba share: a Windows-style network folder that delivers a completed run directly to the right RCC project. RCC supplies the exact share and credentials; do not guess them or reuse another project's connection. Ardia integration is not yet released. When released, the managed vendor platform will require its supported integration or export route.
The Lab network reduces exposure; it does not make a device trusted. RCC must review the owner, software and update needs, vendor support, licensing, credentials, server dependencies, data flow, and target project before connection.
Read Class 16: instrument data and how RCC and the Lab network work together.
Finish the data lifecycle
Class 17 follows data from instrument acquisition through project storage and analysis to a reviewed Coscine archive set. The data-lifecycle TL;DR is the two-page version.
Before archival:
- classify raw data, inputs, intermediates, results, and records;
- select a deliberate frozen archive set;
- add useful metadata, provenance, a manifest, and checksums;
- confirm governance and the destination resource;
- use the supported transfer route when announced;
- verify files, bytes, checksums, metadata, and access;
- record acceptance; and
- decide RCC retention or deletion separately.
When something fails
Do not respond by disabling host verification, opening a network port, sharing credentials, recursively changing permissions, scanning hosts, or repeatedly launching jobs and transfers.
Use the troubleshooting guide, capture the smallest useful diagnostic, remove secrets and research identifiers, and ask through the approved RCC contact route. Include the job ID or support code when available—not private keys, passwords, tokens, patient-related filenames, or entire unrestricted logs.
Choose the next page
- New to RCC: complete the eighteen-class course.
- Analysing data: follow the data-analysis path.
- Building software or services: follow the development path.
- Looking up commands: open the day-to-day reference.
- Connecting now: use the current RCC connection-name guidance.
- Need a person: meet the RCC team and find the contact route.